Hello Crafters,
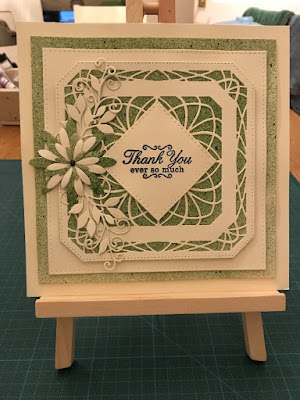
This week we received an amazing
gift from a family member and I set about making an appropriate card to say
thank you. This needed to be something very special and what better way to say
a special thank you than to use the gorgeous Sue Wilson dies for a card in the
style of the wonderful Phill Martin.

Despite looking rather elaborate, this 8x8 card is easy to achieve and uses relatively few supplies (as above).
The first step in making this card is to get all of the die cutting out of the way. I find this much more time efficient than stopping to cut out the bits you need at each stage.
The first step in making this card is to get all of the die cutting out of the way. I find this much more time efficient than stopping to cut out the bits you need at each stage.
Using the Sue Wilson Ornate Pierced Squares from the Noble
Collection, cut out the ornate focal point for the centre of the card in cream
cardstock. Then roughly cut a spare piece of cream card, which will sit behind
this feature when the card is constructed.
You will also need to cut the largest and the second
smallest of the squares from the Noble Collection Double Pierced Squares. This
gives you a small square on which the sentiment will be stamped and a large
square for matting and layering purposes.
One last square is required for the largest of the matting
layers and this should measure 7x7 inches.
Lastly, cut one each of the Finishing Touches Petite Vinery
dies and 5 of the Finishing Touches Delicate Daisies (closed petals) in
graduating sizes from small to large.
Now you have all of the pieces you need to construct your
card.
In the picture below, I have separated the cut shapes into
those that will remain plain cream (top row) and those that we will colour to
create contrasting mats and layers (bottom row).
This is the fun bit! Using an old box to contain the spray
and splatter, lightly spray your die cuts with a Cosmic Shimmer Ink Spray Mist
in your chosen colour; don’t spray directly at your die cuts, but rather spray
overhead a short distance above, so the fine spray mist settles on the card,
rather than large globs and splats of ink.
Continue until your die cut shapes are coloured as light or
as dark as you wish them to be. You are left with a lovely subtle contrast to
the remaining cream elements of the card.


Once your shapes have dried you can begin to construct the final card.
First, adhere the largest of your pierced cream squares to
the large coloured square, using self-adhesive foam pads. Next, glue your
coloured square (with the missing corners) to the back of the ornate cream
design that will be in the centre of your card and mount this onto the coloured
and cream layers you have already put together. Mount this onto a cream 8x8
card blank.
Now stamp your chosen sentiment onto the smallest of the
pierced cream squares, across the middle from corner to corner, creating a diamond-shaped
sentiment topper, which should be mounted onto the centre of the card.
Finally, make the floral embellishment to finish your card,
by layering the coloured and plain die cut flowers to the left of your
sentiment and creating a flourish top and bottom with the Petite Vinery die
cuts. Use a small pearl or a blob of glitter glue for the centre of your
flower.
With best wishes,
Barbara


Comments
Post a Comment